
Got a bit done in the last few days.
I made some paper templates for the sponson deck skins, transferred them to the ply & cut them out.
To make the paper shapes I lay a sheet of good old butchers paper over the area & run my fingers along the edges of the framework, creasing the paper.
Cut the paper about 1/8" bigger.
After trimming & sanding the inboard edge of the panel to match the main stringer, that runs from the tip of the sponson to the transom, they were given a coat of epoxy fiberglass resin on the underside.
The whole inside of the boat was also coated with the resin at this point.
Foam blocks were cut & fitted into all the spaces & sanded to shape.
Then on went the sponson deck skins.
I placed a bead of 1 hour epoxy on all the internal frame work, placed the skin in it's exact place & tacked it down at the transom & at the main bulkhead of the heels of the sponsons.
The left hand skin needed a cut on the underside of it to relieve the pressure where the framework sort of curves down & then levels out towards the chine, creating dip in the skin.
Then I stitch glued around the edges, keeping the skin pressed down & flat. Working forward from the transom. Some CA accelerator in the pump spray bottle is a great thing to have here, as everything is held in place by hand during this operation. The boat needs to be rotated upside down & sideways to get the CA to flow where you want it to go.
Then a bead of CA is run along the joins, a section at a time, allow the glue to wick into the joint then squeeze together & spray with accelerator.
Of course the other method of Epoxy on everything & an array of weights, tape & clamps also works.
Creasing the paper templates.
001.jpg
The dip in the left side deck.
007.jpg
The cut in the underside of the deck.
009.jpg
All glued on ready for final trimming & shaping.
011.jpg
The left side skin with the dip.
010.jpg
-
lambo.
No. I don't bother with a special jig as such.
Just some straight lines drawn on a board where the main stringers run, & a couple of lines 90 degrees to them where the main bulkhead for the heels of the sponsons, & the transom sit. I place weights on the frame work to keep it all flat on the board. And I constantly check that all the framework is parallel the lines each time I glue something.
The board needs to be high enough to allow the sponsons to clear the workbench, & wide enough to fit between the two outside stringers/air traps.
One thing that I add, is a piece of 1/8" ply between the sponsons to keep them spaced correctly & square to the board, while gluing all the frame work & the sponson skins. It will stay there until the final sheeting of the decks. It stops the sponsons from twisting.
You will see the piece glued on in this pic.Leave a comment:
-
Paul, thank you for posting the build pics. Did you use a jig for the initial framing or did you just square it up as your went?Leave a comment:
-
Yep.
Jim does a great job. Everything is a precision fit. Just a bit of sanding required to smooth out some of the banding lines, & then I can assemble some of the individual pieces & send it off the the paint shop. (That's the right hand front corner of the work bench).
I got home from night shift at 5:00AM this morning, & decided to cut & fit the aluminium backing plates for the turn fin bracket & side brace before going to sleep. Also the doubler on the transom.
Transom doubler epoxied on with a ply doubler on the floor of the tub for the internal strut bracket.
001.jpg
Plates for the turn fin bracket & the side brace on the inside of the anti trip skin.
002.jpgLast edited by 785boats; 02-08-2018, 06:59 PM.Leave a comment:
-
Motor looks sweet. You have alot detail painting to do, but will be totally worth it.Leave a comment:
-
That motor kit looks awesome. Amazing detail. 3D printing is so cool. I can't imagine writing the program.Leave a comment:
-
Woo!! Hoo!!
I just took delivery of the twin turbo Allison V12, From Jim at http://www.scale-3d.com/gallery
Man that was quick. I only ordered it 13 days ago. Ha had to make it, & then he got it shipped all the way to Australia in that time. Brilliant. Thanks Jim.
A bit of work for the mechanics now.
There are three pages of instructions with coloured pictures, so they shouldn't have a problem.
008.jpgLeave a comment:
-
JestDanny.
The only time they sound better is in their natural element. Probably a Merlin in this one, but you know what I mean.
https://www.youtube.com/watch?v=V0MAv1CHDy8
The ride pads & side skins have been added to the sponsons. I left a slight overhang on the ride pads like we tend to do on the Sports Hydros.
The original boat has a spray rail along the bottom of the side skin where it meets the anti trip skin. At this point you will see that I have left the side skin proud for this. I don't know whether to keep it or not. If you watch the 'Flipping of the Turbinator' video closely, you will see that it is really quite pronounce.
Then the fiddly little rear pods were added.
Basically just two pieces of 1/16" ply shaped & bent to shape.
I'll add a piece of 0.04mm ply on the rear of them to cover that little angled join & finish it off nicely.
Ride pad & side skins added.
005.jpg
Another view showing the bottom of the side skin protrusion for the spray rail.
006.jpg
The rear pods.
004.jpgLast edited by 785boats; 02-05-2018, 11:35 PM.Leave a comment:
-
Thanks, double awesome give me a pack of Allison's duking it out with a flock of Rolls Merlin's any day.Leave a comment:
-
Eric.Originally posted by eric113 View Post
It will be racing in the 1/8 scale class at our club. So yes, it must be built as scale as possible. The angled pieces are in the kit so on they go.
As Pescador pointed out they won't affect the sharp edges of the sponson. I always let my ride plates overhang the rear of the sponsons on hydros by 3/16" or so, to allow the water to break free without riding up the heel.
Guys.
There is still 1-1/4" high flat area to mount a bracket.
The "Chief Design Engineer", down in the workshops, has advised that we will simply copy the philosophy of the full size boats. There will be a bracket on the heel of the sponson, & a brace across to the anti trip skin from the rear of the fin to help take the load. A mounting plate will be added to the inside of the skin for attachment of the brace.
I've just signed off on the preliminary worksheet.
JestDanny.
This is for you. Check out the water injection into the turbos.
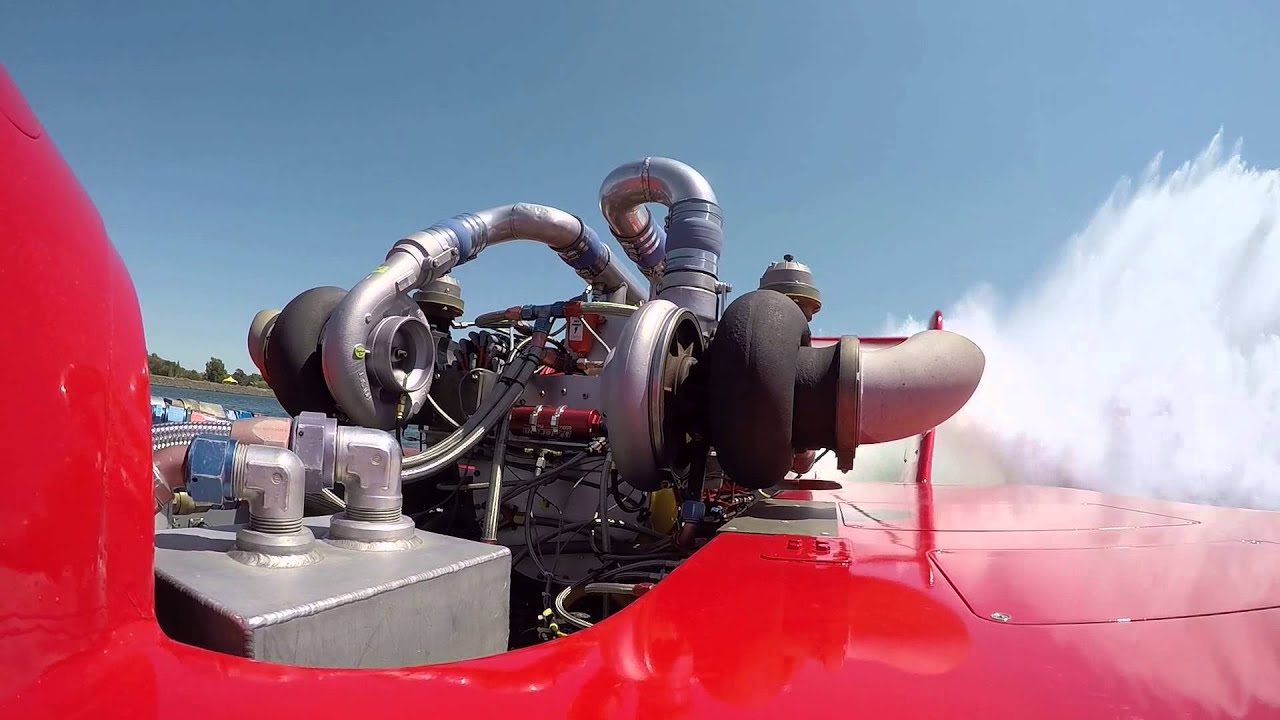
Leave a comment:
-
It will take some creative thinking for sure, but the engineers make the big bucks lol.
Sent from my iPad using TapatalkLeave a comment:
-
Very true, you do want sponsons to be flat with sharp corners. I was meaning for turn fin, doesn’t make harder to setup the bracket so the turn fin is parallel?Leave a comment:
-
I think it’s only the rear edges of the ride surfaces you want to have sharp and straight. I don’t think the angled part comes down far enough to affect anything except making the turnfin mount a challenge. [emoji3]
Sent from my iPad using TapatalkLeave a comment:


Leave a comment: