R2 rigger rebuild

Collapse
X
 
  • Time
  • Show
Clear All
new posts
  • steamboatbob
    Member
    • Jan 2010
    • 51

    #16
    yes i moved the sponsons down about 10mm (just under1/2 inch) in the central hull thus the hull will sit taller when on the plane.

    but have applied a secondary coat of epoxy to the main tub and decided that the top will be painted as it will be a bit difficult to get the CF along the narrow parts and with the lefover CF i am thinking the sponsons might get a bit but i am starting to wonder about how much weight i am adding to the hull and dont want to go overboard as i cannot remove that much from it.

    Second layer of epoxy went on nicely using the card trick (bit of scrap ABS)

    I'll post a photo soon but nothing looks different atm
    My budget on boats depends on how much money the wife dosent know i have

    Comment

    • siberianhusky
      Fast Electric Addict!
      • Dec 2009
      • 2206

      #17
      Remember to re attach the rear sponsons the same amount lower or it will have some serious running attitude problems, the angle of attack on the sponsons would be way to steep if the front of the hull is a 1/2" higher than the back.
      If my boats upside down then who owns the one I thought I was driving the last two laps?

      Comment

      • martin
        Fast Electric Addict!
        • Aug 2010
        • 2881

        #18
        Your better off painting hydros as you can then use bright colours, So much easier to see them at speed. Martin.

        Comment

        • ray schrauwen
          Fast Electric Addict!
          • Apr 2007
          • 9873

          #19
          Originally posted by steamboatbob View Post
          yes i moved the sponsons down about 10mm (just under1/2 inch) in the central hull thus the hull will sit taller when on the plane.

          but have applied a secondary coat of epoxy to the main tub and decided that the top will be painted as it will be a bit difficult to get the CF along the narrow parts and with the lefover CF i am thinking the sponsons might get a bit but i am starting to wonder about how much weight i am adding to the hull and dont want to go overboard as i cannot remove that much from it.

          Second layer of epoxy went on nicely using the card trick (bit of scrap ABS)

          I'll post a photo soon but nothing looks different atm
          Cool. I didn't know if I could do that without doing itto the sponsons also.

          I'm going to drill a hole or two in my front sponsons or crack one side open, add epoxy to seal and spray foam to fill.

          I'm not too worried about weight, if it's too heavy for spec power then I'll add some steroids to it

          I might put a ski on mine instead of rear sponsons... we will see...
          Nortavlag Bulc

          Comment

          • steamboatbob
            Member
            • Jan 2010
            • 51

            #20
            just letting you guys know that things are transpiring her but with the cold weather settling in nothing is really getting done i have reattached the rear sponsons and im halfway through giving it a lick of paint the front sponsons will be my next thing and also sorting out the hardware and driveline Grim racer turn fin was attached to the right hand sponson inside the box to make it a little more solid and i will CF the tops and backs of the sponsons to give it a little strength and good looks.

            The hull and motor weigh in at 1131 grams atm so i am on track for the moment

            My budget on boats depends on how much money the wife dosent know i have

            Comment

            • sailr
              Fast Electric Addict!
              • Nov 2007
              • 7128

              #21
              Quote "busted a pooper valve" Unquote
              Mini Cat Racing USA
              www.minicatracingusa.com

              Comment

              • sailr
                Fast Electric Addict!
                • Nov 2007
                • 7128

                #22
                Your wife's gonna be pissed if you get epoxy on that beautiful teak table!

                Originally posted by steamboatbob View Post
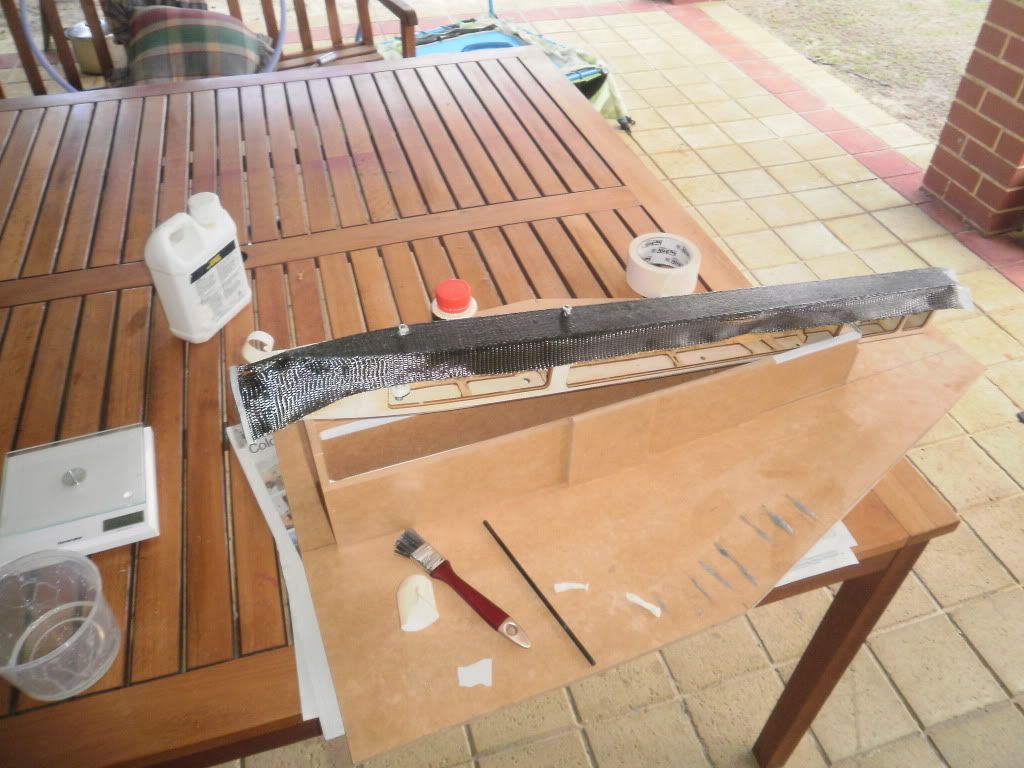
                well the carbon job has started i am just going to put 1 layer of unidirectional tape on the tub to give it a bit of support but mostly im oing it for the look and this is something i want to try out

                found a few great videos from the following website on layering carbon fibre over anything, they use their own products but it seems that it will be the same if i use someone elses products


                for the carbon fibre i am using west system 105/206 and i'll see what i can do for the top coat.

                also i am laying the carbon fibre down and letting it harden on each side and trimming it square before i do any top coats as i want the topcoat to be done in one hit if possible

                and here we are at present, I did find that a small offcut of carbon tube for my outrigger was an excellemt tool for pressing the CF down onto the hull

                and this is the result sofar

                Mini Cat Racing USA
                www.minicatracingusa.com

                Comment

                • sailr
                  Fast Electric Addict!
                  • Nov 2007
                  • 7128

                  #23
                  Thanks for this informative RE build. I had considered one of the R2 riggers but now I believe I would rather build a JAE kit!
                  Mini Cat Racing USA
                  www.minicatracingusa.com

                  Comment

                  • T.S.Davis
                    Fast Electric Addict!
                    • Oct 2009
                    • 6266

                    #24
                    You've actually managed to inspire me to build another rigger. Thank you sir.
                    Noisy person

                    Comment

                    • steamboatbob
                      Member
                      • Jan 2010
                      • 51

                      #25
                      well after pondering this arvo i put on my first clear coat

                      and Sailr i refinish that table once every year due to my working on it


                      My budget on boats depends on how much money the wife dosent know i have

                      Comment

                      • steamboatbob
                        Member
                        • Jan 2010
                        • 51

                        #26
                        and the pink paint was for my daughters dolls house i built her, the little cherub just turned 5
                        My budget on boats depends on how much money the wife dosent know i have

                        Comment

                        • steamboatbob
                          Member
                          • Jan 2010
                          • 51

                          #27
                          next problem i have is with the hardware and i need a little nudge in the right direction, the 4mm shaft and square drive that came with the rigger is badly ballanced and in my honest opinion deserves to go to the bin and i am unsure of what type of shaft arrangement to go with 1/8 or 3/16 could someone point me in the right direction as i would only need the strut, flex shaft, drive dog, preferably pre assembled. it will be connected to a leopard 4074 2200KV on 14.8V

                          the other mod i have been working on is modifying the turnigy 180 ESC cooling block trying to find some 90 degree elbows that are nice and big is a trial in itself i hope that OSE get some of the leopard 90 degree cooling fittings with the m5 fittings in their next order. It is a basic job to unscrew the old cooling fittings and screw in the 90 degree elbows off the leopard motor cooler and they are a much larger internal diameter than any other on the market but also impossible to get. the main reason for this is i want to rotate the esc 90 degrees iside the hull so that the caps and the wiring are not touching the sides of the hull here is what im trying to do in the photo below and it gives me 5mm clearance either side of the esc in the hull, so it is a neccesary job to do, and with the straight fittings it is impossible to turn the speed control as i would be putting a kink in the cooling tubing.

                          Cheers guys and i hope you ordered the fittings steven as i want them badly

                          BoB

                          My budget on boats depends on how much money the wife dosent know i have

                          Comment

                          • martin
                            Fast Electric Addict!
                            • Aug 2010
                            • 2881

                            #28
                            With the 4074 motor you deff need 3/16" flex, A 1/8" is much to small. Martin.

                            Comment

                            • steamboatbob
                              Member
                              • Jan 2010
                              • 51

                              #29
                              well after the weather gods gave me a bit of sunshine i did my final coat of resin to the sponsons,

                              also done since my last post
                              - installed hughey 3/16 flex shaft (had an old crumbgrabber strut and rudder from fullers)
                              - installed motor mount
                              - installed brass tubing
                              - installed 90 degree elbows to the esc to turn it 90 degrees inside the hull
                              - made improvements to the hatch by putting a few blocks of balsa onto the origional one and the put a layer of resin on it i still need to clean it up and spray it but i wil do that when i spray the sponsons)
                              - moved the rubber bellows for the servo to the back of the boat instead of being inside
                              - finished off the main tub and gave it a used look by sanding the paint back quite a lot down to the ply in some areas and coated it with clear
                              - purchased a Garmin E-Trex H to give me a good indication of how fast it goes i had my friends 1 Mtr land yacht at 20 KPH

                              With the teflon tubing i received with the flex shaft i found it to be a little oversized so i got some tighter teflon and put that inside the teflon tube at the top bottom and middle of the teflon that i got with the flex shaft resulting in a teflon liner that can hold a bit of grease and still be free enough for the drive shaft


                              and here are some pics if you guys want a more detailed pic of what i have done yell out and ill get it up for you

                              question for the day "is a bearing at the motor going to change anything and if so what sort would be best suited for this boat"

                              Cheers guys and I really appreciate the help and comments that have been posted here


                              My budget on boats depends on how much money the wife dosent know i have

                              Comment

                              • steamboatbob
                                Member
                                • Jan 2010
                                • 51

                                #30
                                Well after a long awaited time i can clap cheer and make a fool of myself

                                It's ready for the water

                                hopefully this arvo i will be able to video some footage for you guys

                                My budget on boats depends on how much money the wife dosent know i have

                                Comment

                                Working...