ML Boatworks PS295 Build (Jedi Masters - No. 8).

Collapse
X
 
  • Time
  • Show
Clear All
new posts
  • Jedi Master
    Senior Member
    • May 2008
    • 242

    #1

    ML Boatworks PS295 Build (Jedi Masters - No. 8).

    Hey Guys, this thread will document my efforts to complete my ML Boatworks PS295 build as per Mike's recommendations. I am not building the kit, but simply adding all of the recommended running gear (ESC, Motor, Prop, Servo) that Mike suggests. As I'm no expert in the art of boat building the thread may change along the way, as I want to ensure that my posts meet Mike's approval I'll post the details of the items that I'm using as the build progresses, but I'll also make a full list that will be detailed at the end.

    Here goes.....

    I always ensure that I have all of the required materials prior to starting any build, so after taking delivery of my hull I also ordered the rest of the parts that I need;


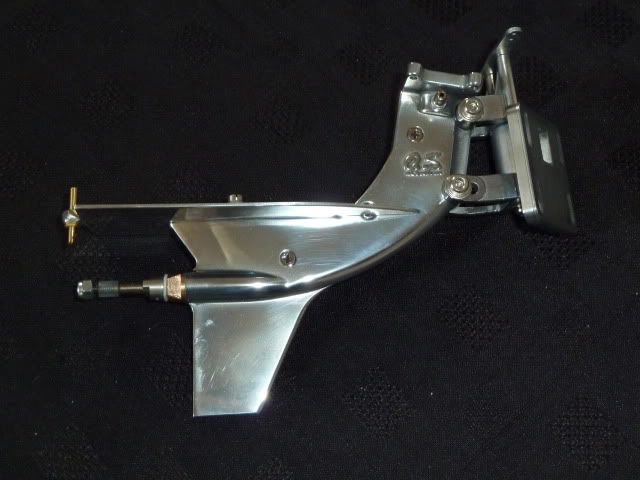
    I've decided to put the outboard together first. This is an O.S. lower unit;

    http://www3.towerhobbies.com/cgi-bin...?&I=LXCP20&P=7

    I also had mine polished by Hazegry;

    http://forums.offshoreelectrics.com/...shing-services
    Last edited by Jedi Master; 09-04-2011, 08:44 AM.
    Do or do not, there is no try!!!!!
    Aeromarine Titan 29 H&M Hawaii Kai III Proboat Stiletto ML Boatworks PS295 (No.8)
  • Jedi Master
    Senior Member
    • May 2008
    • 242

    #2
    Prior to the next step I took the unit apart and added plenty of Pro-boat Marine Grease to the shaft and also thread-locked all of the screws in.

    To fit an electric motor to this unit you'll need the O.S. electric conversion kit from Hyperformance;

    http://www.offshoreelectrics.com/pro...-eobckOS35-5mm

    I'm using a stock Aquacraft brushless motor from the UL-1;

    http://www.offshoreelectrics.com/pro...od=dh-aqug7001

    Before you screw this to the mounting plate, you'll need to add the coupler. I added plenty of thread-lock to both of the grub-screws;


    Then you can add the motor adaptor plate;


    When attaching to the lower unit, I used thread lock on all four bolts. Each to their own, but I prefer the Tamiya stuff;


    Should end up like this;

    Do or do not, there is no try!!!!!
    Aeromarine Titan 29 H&M Hawaii Kai III Proboat Stiletto ML Boatworks PS295 (No.8)

    Comment

    • Jedi Master
      Senior Member
      • May 2008
      • 242

      #3
      Next I added my cooling jacket. Kintec do a really nice 'UL-1 Super Cooler' version;


      But, I couldn't get hold of one of these so I've used an Etti Racing type;


      It comes with the 'O' rings and also the connectors, but you'll need to drill the holes yourself. I chose to put one in the top and then one in the bottom on the opposite side, to ensure maximum flow & coverage around the motor. I took my time with the drill to ensure that the holes were only just big enough. The connectors pushed in tightly and then I used epoxy to seal them from both sides.


      Fitting the o-rings onto the motor first, I then smeared them with vaseline before adding the cooler. Its a fidley job, but the fit is very good once mounted.

      Do or do not, there is no try!!!!!
      Aeromarine Titan 29 H&M Hawaii Kai III Proboat Stiletto ML Boatworks PS295 (No.8)

      Comment

      • Jedi Master
        Senior Member
        • May 2008
        • 242

        #4
        Next I added my prop, which is a balanced and sharpened Octura M445.

        http://www.offshoreelectrics.com/pro...rod=octsb-m445


        Just above the prop sits the water pick-up. I noticed that the exit point on the top side of the pick-up has quite a small diameter opening, so I gently drilled this out to match the full internal diameter of the tube. This should ensure maximum possible water flow through the cooling system.


        The lower unit has two nipples to allow lubrication of the shaft without having to take it apart, one at either end of the shaft. As I'm using grease instead of oil, I've simply added a peice of cooling tube to keep water out when in use.


        Before you attempt to mount the unit, you'll need to invert the mounting plate, otherwise the ride height won't be right. It should look like this;


        That completes the lower unit;

        Do or do not, there is no try!!!!!
        Aeromarine Titan 29 H&M Hawaii Kai III Proboat Stiletto ML Boatworks PS295 (No.8)

        Comment

        • cybercrxt
          Fast Electric Addict!
          • Mar 2009
          • 2909

          #5
          Looking good so far Jedi! Nice lower unit! Mike
          Laser cut, birch plywood rc race boat kits- WWW.MLBOATWORKSRC.COM WWW.DINOGYLIPOS.COM

          Comment

          • ron1950
            Fast Electric Addict!
            • Aug 2010
            • 3024

            #6
            nice call on drilling out the water pick up......
            MY RETIREMENT PLAN?????.....POWERBALL
            74 vintage kirby clasic hydro, pursuit mono, mg, 47'' mono, popeye hydro...

            Comment

            • F1 madness
              Senior Member
              • Feb 2010
              • 788

              #7
              Looking good so far bud
              http://s577.photobucket.com/albums/s...79/F1%20boats/
              Daz from sunny England

              Comment

              • Jedi Master
                Senior Member
                • May 2008
                • 242

                #8
                Servo....

                So next up; time for the servo installation. I'm using a nice carbon fibre servo mount that I got from OSE;

                http://www.offshoreelectrics.com/pro...prod=ose-80092


                I'm using a beefy servo too. Considering the weight of the boat when finished, and the speed that it corners at, you need something that is gonna hold up. Mine is a Hitec HSR 5995 TG. It's been around for a while, and has been replaced with Hitec's latest equivalent, but it's a rock solid servo that has never let me down;

                http://www.servodatabase.com/servo/hitec/hsr-5995tg


                The servo arm needs to be strong enough to handle the weight, and I've seen a lot of people miss this point when using heavy duty servo's in demanding applications. I'm using the Dubro heavy duty type;

                http://www.offshoreelectrics.com/pro...hp?prod=dh-672
                Last edited by Jedi Master; 09-04-2011, 04:58 AM. Reason: To sdd servo arm link.
                Do or do not, there is no try!!!!!
                Aeromarine Titan 29 H&M Hawaii Kai III Proboat Stiletto ML Boatworks PS295 (No.8)

                Comment

                • Jedi Master
                  Senior Member
                  • May 2008
                  • 242

                  #9
                  Install....

                  To mount the servo, I cut some small flat sections of ply and put grooves in them for the servo mount to sit in. This ensures that the epoxy flows through the holes in the bottom of the CF mount and also keeps the servo in place whilst drying;


                  As I'm putting my receiver up front, I've left enough room to get it in/out. It also leaves enough clearance to unscrew the servo from the mount for maintenance/replacement if required;


                  IMPORTANT; before you start gluing in the servo, make sure you do a mock-up with all of your components to ensure that they fit as you want them to. With the batteries that I intend to use I'm able to use one of the radio box locator/strengthener tabs as a marker point. I think this will be OK for most installs, but your mock-up will confirm this.

                  Do or do not, there is no try!!!!!
                  Aeromarine Titan 29 H&M Hawaii Kai III Proboat Stiletto ML Boatworks PS295 (No.8)

                  Comment

                  • Jedi Master
                    Senior Member
                    • May 2008
                    • 242

                    #10
                    At the rear of the boat you need to work out your layout for the steering rods/cables and the entry/exit points of your electric cables and water cooling tubes. There's a number of different possibilities here and I'm opting to install an additional bulkhead, made from plasticard, which will hold my inlet/outlets and power cables. I'll then use brass tubes to act as guides for the steering rods;

                    I drilled out the existing holes to allow fitment of my 1/2" tube;


                    Brass tube; (from Chicago..)


                    And the bulkhead fittings from OSE;

                    http://www.offshoreelectrics.com/pro...prod=aero-2014

                    I always do a mock-up to check my fitment/idea;


                    Water cooling and power cables will run through the plasticard bulkhead, whilst the steering rods will run through the brass tubes in the upper section;

                    Last edited by Jedi Master; 09-04-2011, 07:00 AM. Reason: To add links to products.
                    Do or do not, there is no try!!!!!
                    Aeromarine Titan 29 H&M Hawaii Kai III Proboat Stiletto ML Boatworks PS295 (No.8)

                    Comment

                    • Jedi Master
                      Senior Member
                      • May 2008
                      • 242

                      #11
                      To ensure the bulkead fittings remain robust, I'm strengthening them using Milliput and epoxy;


                      On the brass tube I've left enough tube exposed to ensure I can fit my rubber water seals;


                      The tube's in the upper section get supported with plenty of milliput pushed into the top corners of the box section;


                      Looks like this from the rear;


                      Then, once the milliput is dry, I cover it with a good layer of epoxy to seal/strengthen it further;

                      Do or do not, there is no try!!!!!
                      Aeromarine Titan 29 H&M Hawaii Kai III Proboat Stiletto ML Boatworks PS295 (No.8)

                      Comment

                      • Jedi Master
                        Senior Member
                        • May 2008
                        • 242

                        #12
                        Next I decided to fit the already assembled lower unit to the rear bulkhead.

                        I drilled out the mounting holes, which was simple as Mike has them pre-marked on the kit.


                        Make sure you used decent hardware which won't rust. I also selected small washers for the exterior side and large ones for the interior as well as decent nylon locking nuts. It may be overkill, but I used thread-lock as well, just for good measure!


                        The bottom of the lower unit mounting plate should site 1/16" above the bottom of the bulkhead;


                        The large washers on the inside ensure that the bolts cannot 'pull through' and add strength to the fitting;

                        Do or do not, there is no try!!!!!
                        Aeromarine Titan 29 H&M Hawaii Kai III Proboat Stiletto ML Boatworks PS295 (No.8)

                        Comment

                        • Jedi Master
                          Senior Member
                          • May 2008
                          • 242

                          #13
                          This next part is purely a personal preference. Following a particularly expensive incident involving a 6S lipo going thermal in my beloved Toysport Triton, I now fit heat wadding in my hulls. This stuff can withstand the heat produced by a shorting lipo, so I'm going to lay some in the bottom of the radio box. As it's quite a fibrous material (its a strange sort of ceramic/glass fibre product) I'm going to cover it with some carbon fibre vinyl, just to keep it in place and stop it from fluffing over time;


                          Once the boat is finished I may add this to the sides of the radio box also, but for now I'm just covering the bottom section;


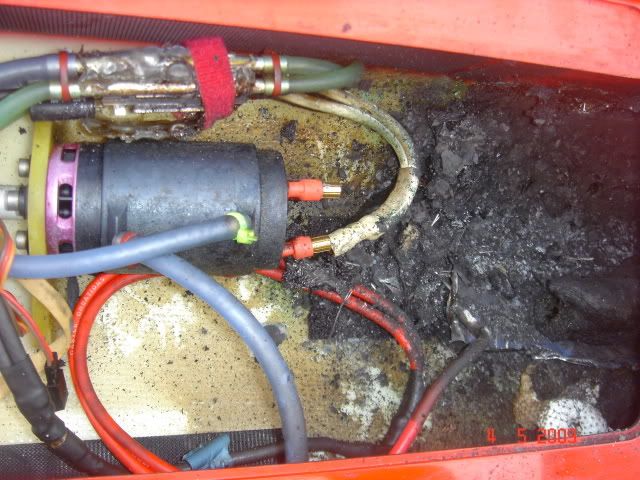
                          This seems an excessive measure, but I've been burned once (literally) and its a simple thing to do, which could prevent the total loss of a hull, should the unthinkable happen. I know there are lots of views/opinion about lipo safety but sometimes, no matter how well you follow the correct operating procedure's, something can go wrong and cost you a lot of money. I follow charging/storage and usage recommendations of my lipo's 'exactly' as manufacturers recommend but I still suffered a nightmare; For your amusement, at my cost;


                          Thermal wadding would've stopped the heat from burning through the hull;


                          RIP Triton.....
                          Do or do not, there is no try!!!!!
                          Aeromarine Titan 29 H&M Hawaii Kai III Proboat Stiletto ML Boatworks PS295 (No.8)

                          Comment

                          • Jedi Master
                            Senior Member
                            • May 2008
                            • 242

                            #14
                            To connect up the steering I'm using 4-40 threaded rods, MFA collets, Dubro safety locks (or ball links if these don't seem strong enough), Aquacraft seals and also some rubber safety caps that are actually meant for covering the exposed connectors of your lipo's;

                            http://www.offshoreelectrics.com/pro...od=dh-4-40-rod
                            http://www.offshoreelectrics.com/pro...hp?prod=dh-817


                            Last edited by Jedi Master; 09-04-2011, 06:55 AM.
                            Do or do not, there is no try!!!!!
                            Aeromarine Titan 29 H&M Hawaii Kai III Proboat Stiletto ML Boatworks PS295 (No.8)

                            Comment

                            • Jedi Master
                              Senior Member
                              • May 2008
                              • 242

                              #15
                              I added two of the quick-lock connectors to 4-40 rods and hitched them up to the outboard. On either side of the brass tubing I added the red balloon seals and also the Aquacraft rod seals, which were locked into place with zip-ties;


                              Then I put the other two 4-40 rods together with the connectors and cut them to size, ensuring that the 'join' was towards the front of the boat. I added a single MFA collet to each pair and placed fuel tubing on either side of them to ensure there would be no issues from 'rubbing' on the batteries or box sides, then connected them up to the servo;


                              External water cooling tubing added;


                              And a shot of the rear, showing the red balloon seals. the cooling tubes have been crossed as this keeps them away from the linkages when the outboard operates from side to side;

                              Do or do not, there is no try!!!!!
                              Aeromarine Titan 29 H&M Hawaii Kai III Proboat Stiletto ML Boatworks PS295 (No.8)

                              Comment

                              Working...